服务器基本配置
1. 域名解析
为了方便登录,将域名解析到云服务器IP地址。
1.1 获取服务器公网IP
(1)本地服务器
对于本地服务器,登录后,用命令ifconfig查看服务器的IP地址,举例如下:
# ifconfig
enp2s0: flags=4163<UP,BROADCAST,RUNNING,MULTICAST>  mtu 1500
        inet 172.24.216.83  netmask 255.255.224.0  broadcast 172.24.223.255
        inet6 2001:250:6801:5551:c225:a5ff:fe9c:d012  prefixlen 64  scopeid 0x0<global>
        inet6 fe80::c225:a5ff:fe9c:d012  prefixlen 64  scopeid 0x20<link>
        ether c0:25:a5:9c:d0:12  txqueuelen 1000  (Ethernet)
        RX packets 8073743  bytes 3125211232 (3.1 GB)
        RX errors 0  dropped 1255324  overruns 0  frame 0
        TX packets 1921200  bytes 438686566 (438.6 MB)
        TX errors 0  dropped 0 overruns 0  carrier 0  collisions 0

lo: flags=73<UP,LOOPBACK,RUNNING>  mtu 65536
        inet 127.0.0.1  netmask 255.0.0.0
        inet6 ::1  prefixlen 128  scopeid 0x10<host>
        loop  txqueuelen 1000  (Local Loopback)
        RX packets 3557950  bytes 563216895 (563.2 MB)
        RX errors 0  dropped 0  overruns 0  frame 0
        TX packets 3557950  bytes 563216895 (563.2 MB)
        TX errors 0  dropped 0 overruns 0  carrier 0  collisions 0
(2)云服务器
在网页版登录控制台,查看服务器公网IP。
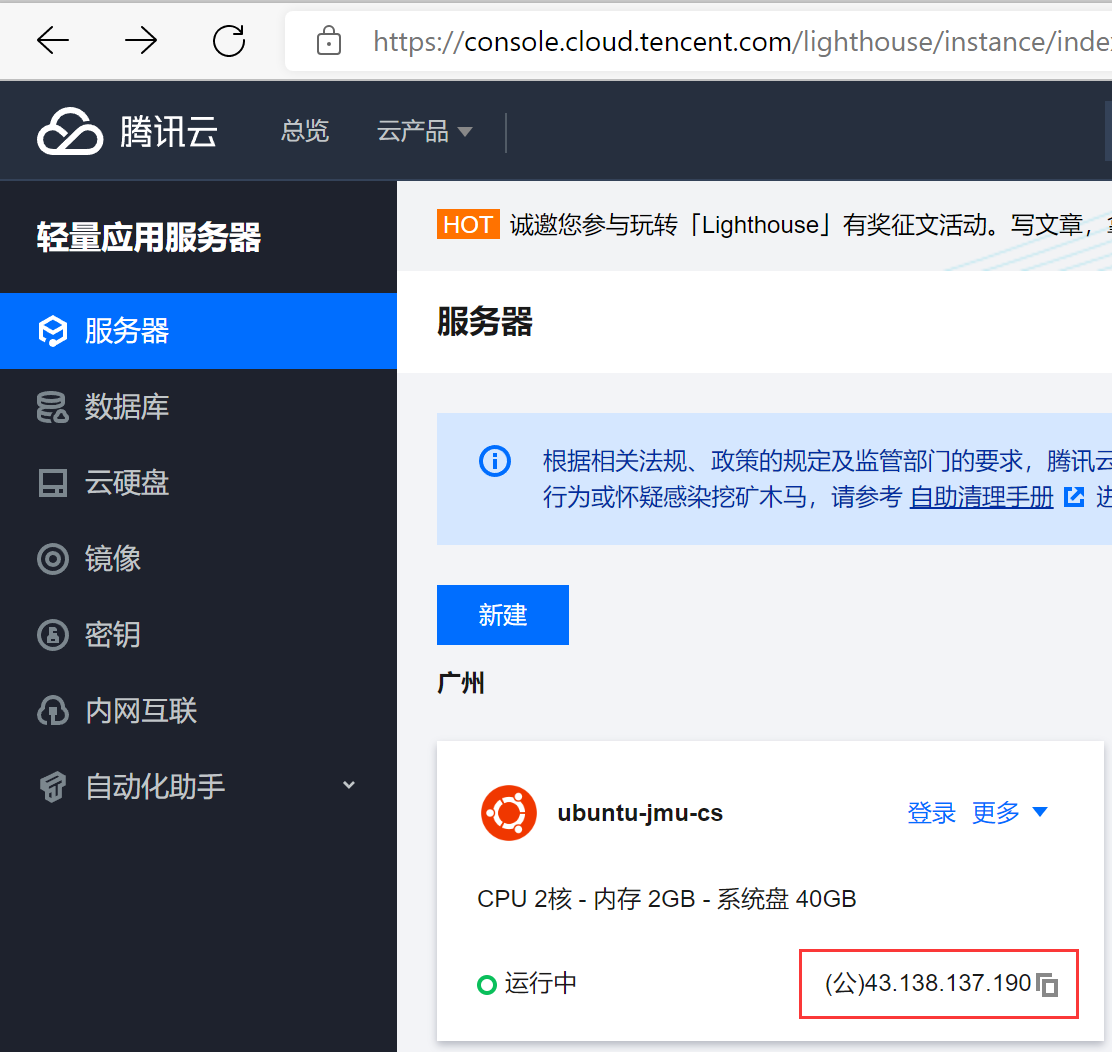
以腾讯云为例,登录腾讯云,点击云产品,点击购买的服务器类型,比如我买的是轻量应用服务器。
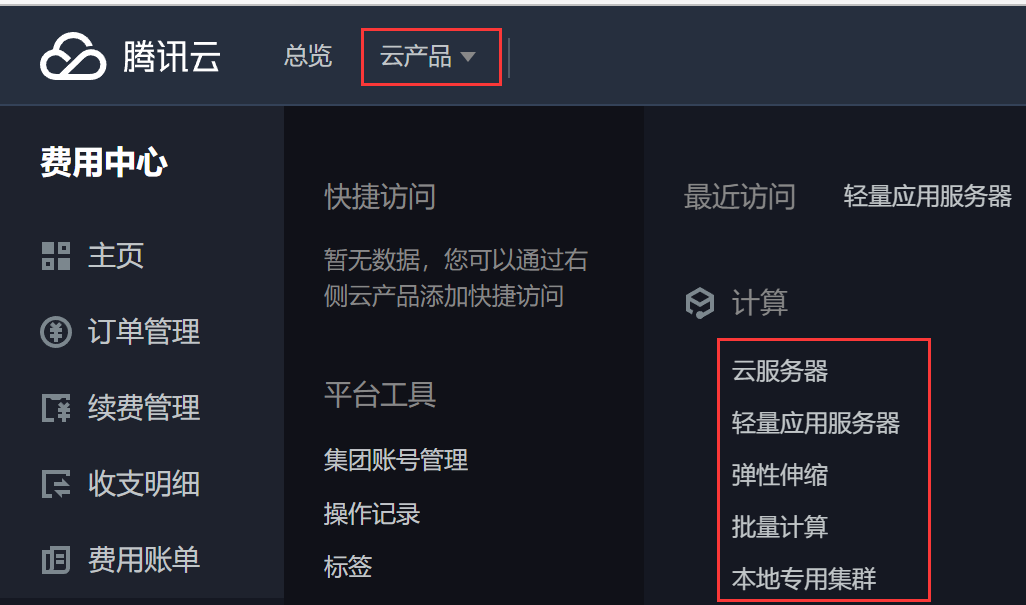
便可看到服务器公网的IP,如下图所示。
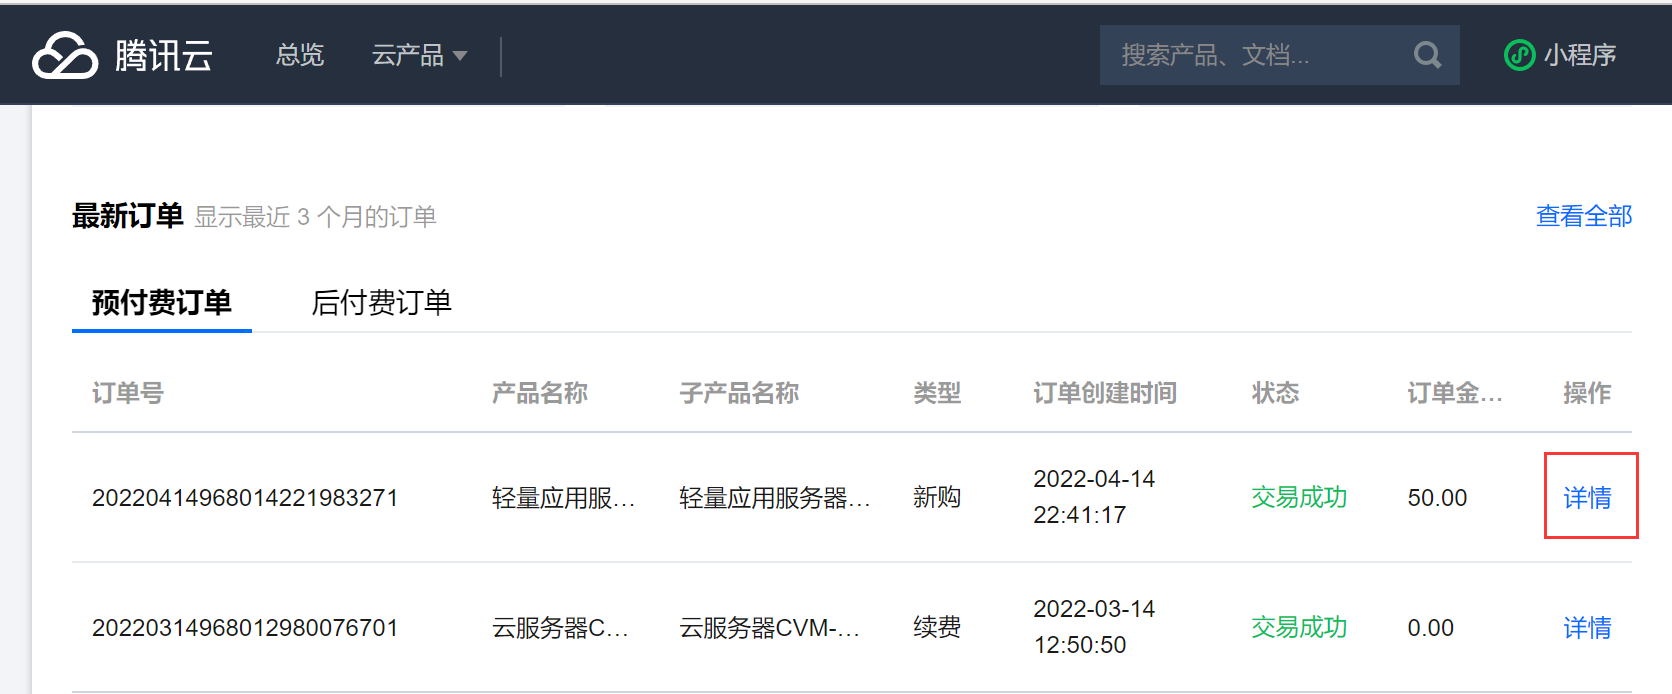
或者点击右侧控制台,往下拉,在最新订单,点击详情,如下图,进入
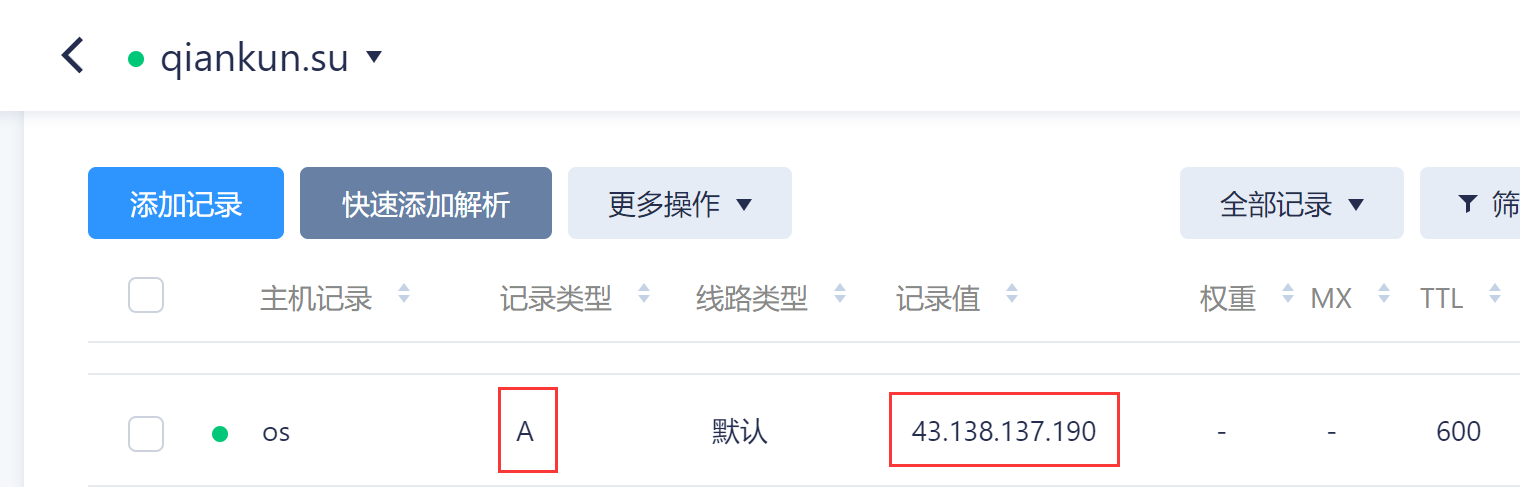
1.2 添加域名解析
为该IP地址添加A记录。
2. 远程登录服务器
对于本地服务器,用SSH登录。公有云通常会提供多种方式登录,腾讯云提供了三种远程登录方式:一键登录(在页面中登录)、SSH、VNC。这里使用SSH登录实例。
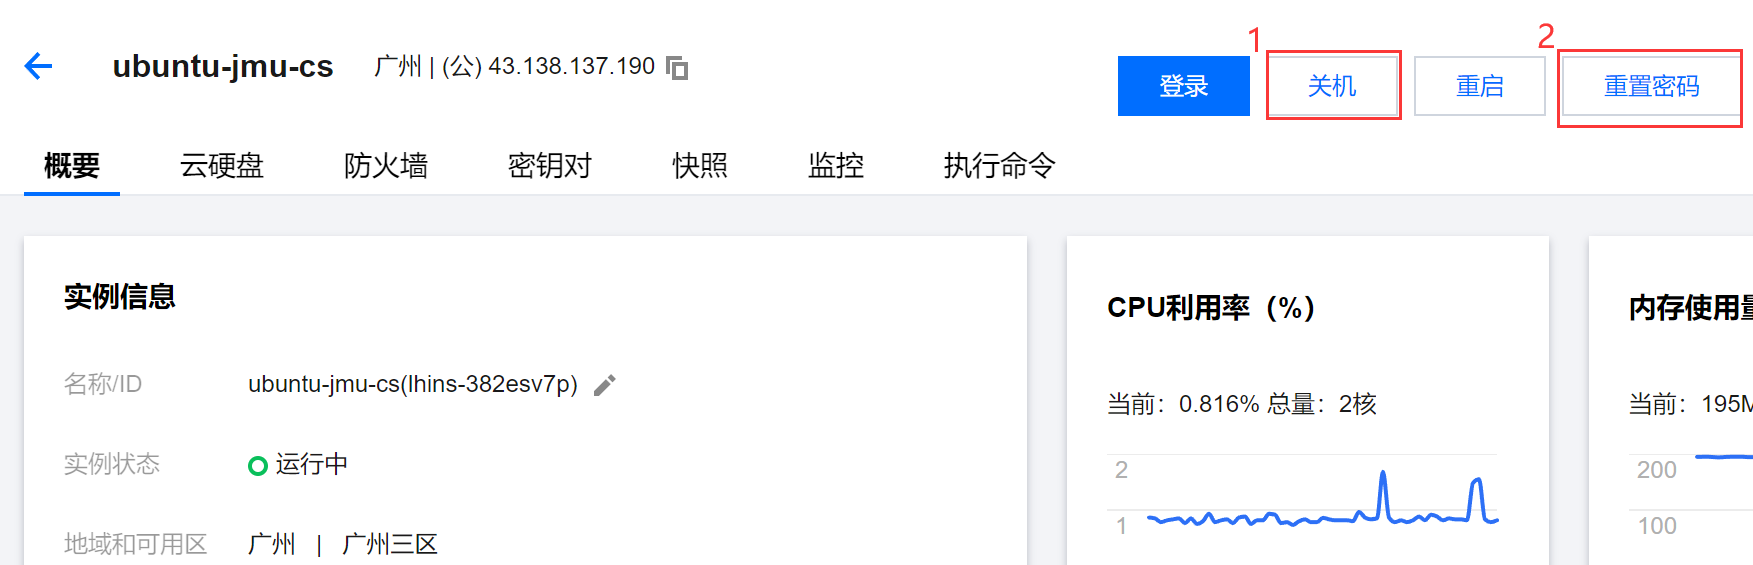
2.1 重置实例密码
在公有云搭建的服务器,获取系统的登录密码,先关机,重置实例密码,如下图所示:
2.2 SSH远程登录
SSH远程登录服务器,但遇到如下问题:
$ ssh root@os.qiankun.su
@@@@@@@@@@@@@@@@@@@@@@@@@@@@@@@@@@@@@@@@@@@@@@@@@@@@@@@@@@@
@    WARNING: REMOTE HOST IDENTIFICATION HAS CHANGED!     @
@@@@@@@@@@@@@@@@@@@@@@@@@@@@@@@@@@@@@@@@@@@@@@@@@@@@@@@@@@@
IT IS POSSIBLE THAT SOMEONE IS DOING SOMETHING NASTY!
Someone could be eavesdropping on you right now (man-in-the-middle attack)!
It is also possible that a host key has just been changed.
The fingerprint for the ED25519 key sent by the remote host is
SHA256:/1pubjnrbXpG7kaWAAzefxiZyVpZ/XUy7Jcvrc8Hlek.
Please contact your system administrator.
Add correct host key in /c/Users/SU/.ssh/known_hosts to get rid of this message.
Offending ED25519 key in /c/Users/SU/.ssh/known_hosts:8
Host key for os.qiankun.su has changed and you have requested strict checking.
Host key verification failed.
解决方法:在本地机器,删除os.qiankun.su缓存的key。
$ ssh-keygen -R os.qiankun.su
# Host os.qiankun.su found: line 1
# Host os.qiankun.su found: line 7
# Host os.qiankun.su found: line 8
/c/Users/SU/.ssh/known_hosts updated.
Original contents retained as /c/Users/SU/.ssh/known_hosts.old
再次登录,正常。
$ ssh ubuntu@os.qiankun.su
ubuntu@os.qiankun.su's password:
Welcome to Ubuntu 20.04 LTS (GNU/Linux 5.4.0-96-generic x86_64)

 * Documentation:  https://help.ubuntu.com
 * Management:     https://landscape.canonical.com
 * Support:        https://ubuntu.com/advantage

  System information as of Sun 17 Apr 2022 09:15:34 PM CST

  System load:  0.05               Processes:             129
  Usage of /:   10.2% of 39.31GB   Users logged in:       0
  Memory usage: 11%                IPv4 address for eth0: 10.0.8.13
  Swap usage:   0%

 * Super-optimized for small spaces - read how we shrank the memory
   footprint of MicroK8s to make it the smallest full K8s around.

   https://ubuntu.com/blog/microk8s-memory-optimisation
值得注意的是,Ubuntu默认的用户名为ubuntu,而不是root。
2.3 允许root用户登录SSH
用安装实例的用户名登录,默认为ubuntu,为root用户设置密码。
$ sudo passwd root
New password:
Retype new password:
passwd: password updated successfully
打开文件/etc/ssh/sshd_config,找到PermitRootLogin,将值改为yes,
PermitRootLogin yes
重启ssh服务器,
sudo service ssh restart
3. 服务器基本设置
(1)修改密码
可以在实例管理界面,点击操作中更多 --> 密码/密钥 --> 重置密码对密码进行重置。或者登录Ubuntu,使用命令sudo passwd修改密码。
ubuntu@VM-8-13-ubuntu:~$ sudo passwd
New password:
Retype new password:
passwd: password updated successfully
注:我登录Ubuntu,用sudo passwd重置密码,输入全部正确,但密码并没有更新。
(2)SSH保持连接
默认情况下,使用SSH登录Linux实例,如果有一小段时间没有操作,就会自动断开。让SSH保持连接,方法为:服务器向客户端(或者客户端向服务端)定期发送报文。通过服务端保持连接,打开/etc/ssh/sshd_config文件,取消ClientAliveInterval和ClientAliveCountMax这两项的注释,并修改其值。
ClientAliveInterval 60  # number of seconds that the server will wait before sending a null packet to the client (to keep the connection alive).
ClientAliveCountMax 2   # If no response comes, keep trying the above process till 2 times
运行sudo service sshd restart,重启SSH,使配置生效。
(3)修改命令提示符
登录Ubuntu,默认的命令提示符如下:
ubuntu@VM-8-13-ubuntu:~$
现在想把VM-8-13-ubuntu修改成ubuntu,在/etc/profile文件末尾添加如下行(可定制):
export PS1="\u@ubuntu \w:\$ "
修改完后,运行命令source /etc/profile让修改生效。
注:这个并没有每次生效! Ubuntu用户失效,但其他用户都生效了。
附:命令提示符的内容可以定制,各项含义如下:
\u :当前用户的账号名称
\h :短主机名称
\w :当前目录地址
\H :全主机名称
\d :显示日期
\T :显示时间为12小时格式 如:HH:MM:SS 假设下午15点30分20秒:03:30:20
\t :显示时间为24小时格式 如:HH:MM:SS 正常格式15点30分20秒:15:30:20
\A :显示时间为24小时格式 如:HH:MM
\$ :如果是root显示:# 普通用户显示:$
再举个例子:
export PS1="\u@\h \w \H \d \T \t \A \$"

wangfeng@VM-0-6-centos ~ VM-0-6-centos Sun Mar 07 11:51:16 23:51:16 23:51 $
(4)警告cannot change locale
SSH登录时,总是有这个警告-bash: warning: setlocale: LC_CTYPE: cannot change locale (UTF-8): No such file or directory。
解决方法,在/etc/environment文件添加如下行:
LANG=en_US.UTF-8
LC_ALL=en_US.UTF-8
4. 安装软件包
(1)安装C语言库
运行命令sudo apt-get install libc6-dev安装C语言库,否则会产生如下错误:
$ ./compile_and_run.sh
hello.c:1:10: fatal error: stdio.h: No such file or directory
    1 | #include <stdio.h>
      |          ^~~~~~~~~
compilation terminated.
(2)安装gcc
用gcc编译代码,若出现错误,Command 'gcc' not found,运行命令sudo apt install gcc安装gcc。
5. 其他配置
(1)超时自动登出
用户登录Shell,如果有一段时间没有任何操作,就自动登出。在文件/etc/profile添加如下行:
# set a 8 min timeout policy for bash shell
TMOUT=480       # log users out after a period of inactivity automatically
readonly TMOUT  # other users cannot change the value of TMOUT
export TMOUT
运行source /etc/profile使配置生效。过了8分钟,Shell没有操作,就会自动登出。
$ timed out waiting for input: auto-logout
Connection to os.qiankun.su closed.
6. 使用过程遇到问题及解决
(1)git clone遇到错误error: RPC failed; result=18
$ git clone https://github.com/Valloric/YouCompleteMe.git /opt/vim_runtime/my_plugins/YouCompleteMe
Cloning into '/opt/vim_runtime/my_plugins/YouCompleteMe'...

remote: Enumerating objects: 36393, done.
error: RPC failed; result=18, HTTP code = 200MiB | 27.00 KiB/s
fatal: The remote end hung up unexpectedly
fatal: early EOFs:  63% (23149/36393), 19.85 MiB | 27.00 KiB/s
fatal: index-pack failed
RPC是指Remote Procedure Call,在这里RPC failures and http.postBuffer - Azure Repos | Microsoft Docs找到了解释:
If you're still running a Git client that's version 2.8 or older, you should upgrade Git first. There are a bug fixes in newer versions of Git that should obviate the need to set http.postBuffer.
$ git --version
git version 1.8.3.1
$ git config --get http.postBuffer
的确,http.postBuffer没有设置,设置之:
$ git config --global http.postBuffer 524288000
但还是报同样的错误。最后,在这里找到了解决方法,即在git clone命令前加上GIT_CURL_VERBOSE=1:
$ GIT_CURL_VERBOSE=1 git clone https://github.com/Valloric/YouCompleteMe.git /opt/vim_runtime/my_plugins/YouCompleteMe
(2)error: RPC failed; result=52, HTTP code = 0
参考资料:
[1] Linux 修改命令提示符界面 export PS1_weisheixiaoxin的博客-CSDN博客
[2] users - Why can't Linux usernames begin with numbers? - Unix & Linux Stack Exchange
[5] Linux: TMOUT To Automatically Log Users Out - nixCraft
[6] git-config(1)